Miniature Spiral StaircaseDr. Bob
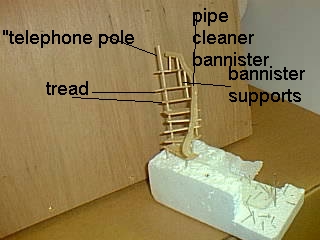
Before starting, please read through completely first for an overview. There is a vast difference between a spiral staircase and a circular staircase. To visualize the difference, think of a telephone pole in front of your house. Both the pole and the house are important. Let us stay with the pole for the moment. Now in your minds eye place steps attached to the pole going from the ground to the top of the pole. The steps will not be placed on one side of the pole and go up to the top; the steps will circle the pole as they ascend. This in essence is a spiral staircase. Now let us go to the house; leave the spiral staircase in place. (in your mind for comparison). Now we will do the same stair placement but around the outside of the house. If you started at the front door at the ground and worked up to the roof by going around the house with placement of the steps. This in essence is a circular staircase. If the core of the staircase is very tight we have a spiral and if the core is open spaced we have a circular staircase. It's all relative. I say no pole: then it's a circular staircase. TO MAKE THE SPIRAL STAIRCASE
PROCEDURE Working in scale cut the treads to size. (I use tongue depressors cut to scale for treads only because I have them by the thousands.) Stack the cut treads so that the "A" corner on all the treads are in a vertical line. Stack the cut treads one on top of the other and clamp the entire set of treads in a stack. You may have to make a few stacks if the dental drill bit is not long enough. To insure that all the holes are in line if you make separate stacks; use one of the prior drilled treads as the top tread in the stack to be drilled. In that way the pre drilled tread acts as a template for the treads to be drilled. Drill all the treads. Refer to the photos to see the effect and get the idea of why we are doing things as described in the text. If you can look closely at the photos you will notice that the top and bottom step are treated a little differently. After drilling all the treads thru the "A" Place your "telephone pole" thru all the holes drilled in "A". Line up the "B" and "C" corners (you can "fan" out the treads and separate them if you wish just to see the budding spiral staircase). Realign the "B" and "C" corners in to a tight stack. Keep the "telephone pole" in place. It assures placement of the holes to be drilled next. Repeat the drilling of a hole thru all of "B" and "C". The bottom step (which was set aside) will now be drilled thru "D". The top step does not get drilled thru "D". BANNISTER SUPPORTS AND BOTTOM TREAD SUPPORT Cut the round toothpicks to remove the points and on the bottom step cut a toothpick to insert in "D" to be in scale and support the bottom step. Refer to photo if needed. The banister supports going thru "B" and "C" are cut to scale and put thru the "B" and "C" holes both offset and long enough to separate the treads in scale and to be of correct height to support the handrail. The Bannister supports will go from step #2 thru hole "C" in step #3 to support the banister. The next banister and tread support goes thru hole "B" in step #3 to the "C" hole in step #4. Again refer to the photos to keep things straight in your mind. It can get confusing. The banister (handrail) in this case was a long pipe cleaner pressed into service as the handrail for photo clarity only. The top step does not have anything in "D". I think enough has been said that any adjustments or freedom of design can be started at this point. If any problem or questions occur fell free to email me or post to SSD as others may have had a similar problem or question. Remember the only question that is foolish is the one you do not ask. DrBob in Delray Beach, FL |
|